The pressurized tank is installed after the pump and before any outlet for water. My pump switch was a 30/50, meaning it would turn on at 30 psi and turn off at 50 psi. The tank is rated at 100 psi maximum so I'm well within range. The tank was dry and I adjusted the pressure in the tank to work with the pump switch. The tank came with 38 psi, I reduced that to 28 psi which is 2 psi BELOW the pump cut-in switch. In the picture above notice the priming tee above the pump. This is where I needed to add water to ensure the pump did not run dry. It took exactly one gallon of water to fill the pump and piping above the check valve.
Notice the pressure gage on the pump housing. I first thought the pressure gage was not working, or the pump was not producing pressure in the line. The gage is on the suction side of the pump, so while the pump is running there is NO pressure and the gage reads 0 psi. When the pump stops the gage reads 50 psi. By moving the pressure gage to the output side of the pump, the gage will then read between 30 psi and 50 psi. This is more useful because you can see when the line looses pressure. I plan to make this change.
The output goes to a hose faucet for now. I put some thought into this setup before starting. I built a platform for the pump and tank to sit on, then put unions into the line. When the cottage gets raised to it's final height, I will then disconnect the suction line at the unions and replace a 6" pipe for a 10' pipe. The pump and tank will be installed under the cottage directly below the utility room, which is where the tank will also be installed. For now, I have water to mix concrete and morter, and for general use.
Friday, July 3, 2009
Thursday, July 2, 2009
Jet pump attached to sand-point well
Today we made major headway. I assembled the plumbing and we now have water from our sand-point well. But I'm getting ahead of myself, a lot was learned from today's experience. I followed the pump and tank instructions. They were pretty straight forward. There were some issues, however, that need to be clarified.
The instructions show a priming tee before and after the pump. The instructions say, "If you have installed a priming tee in the suction piping, remove the plug from the tee and fill the suction piping." In the picture above, you will notice a priming tee where the suction pipe turns toward the pump. Now, here's the catch. Fill the suction pipe ONLY if the check valve is BELOW the priming tee. In the photo above, the check valve is AFTER the priming tee, so any water poured into the priming tee is only returning water back to the earth! What is important to learn is that the pump needs to have water, both on the input side and output side. Since my check valve is close to the pump, the priming tee at the corner of the suction pipe was unnecessary and unneeded.
Thursday, June 25, 2009
Sand point parts after cleaning
The parts I have were cleaned on the outside with a wire wheel on a grinder, and brushed on the inside with a wire brush. Then they were washed inside and out with soapy water, followed by soaking for an hour or so in hot bleach water. They came out very clean and (hopefully) uncontaminated. I'll concentrate on other tasks now, since I'm out of money!
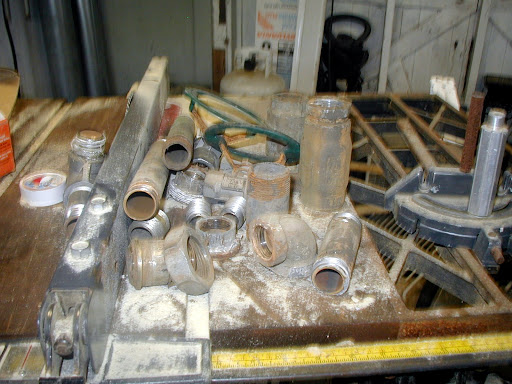
Sand point plumbing parts before cleaning
Found a few pieces of plumbing all mud covered and looking pretty dingy and contaminated from the flood. Most fit AFTER the pump, the input to the pump is 1-1/4" and the output from the pump is 1". I need to purchase 2" parts to plumb from the well to the pump - the suction pipe needs to be at least as large as the input to the pump and preferably larger.
Monday, June 22, 2009
Sand Point Shallow Well, Jet Pump, Tank
The first task I have is to get water to the cottage. Yes, I know, the river is only fifty feet away but I need good clean water for making concrete, mortar, and general use. Notice the driven-point well (sometimes referred to as a "sand point" well) to the right of the pump house. The pump house will need to be removed and the pump repositioned. I needed to find out the depth of the well and the level of water in the suction pipe. I tied a fishing weight and nylon line to a rope and lowered the weight into the suction pipe. The weight hit bottom and the rope came out wet. The well is 20' deep and there was 12' of water in the suction pipe. I subtracted 5' from the depth, the resulting 15' is well within the range for a shallow well pump. Now I need to check plumbing parts to hook up the shallow well jet pump.
Oh, we have so many experiences to tell about
But I'm getting ahead of myself. We are moving into a cottage on the Cedar River in Iowa. A complete renovation is necessary due to the flooding in 2008. The cottage had damage that exceeded 80%, now we need to rebuild as if the cottage was a new construction. Yep, that means building permits, septic permits, deck permits, construction permits, wiring permits......you get the idea. So without any further ado, I will began at the beginning and go through the renovation and provide pictures where appropriate. Since this is my first attempt at Blogging, I will stop for today and continue as we move forward.
Subscribe to:
Posts (Atom)